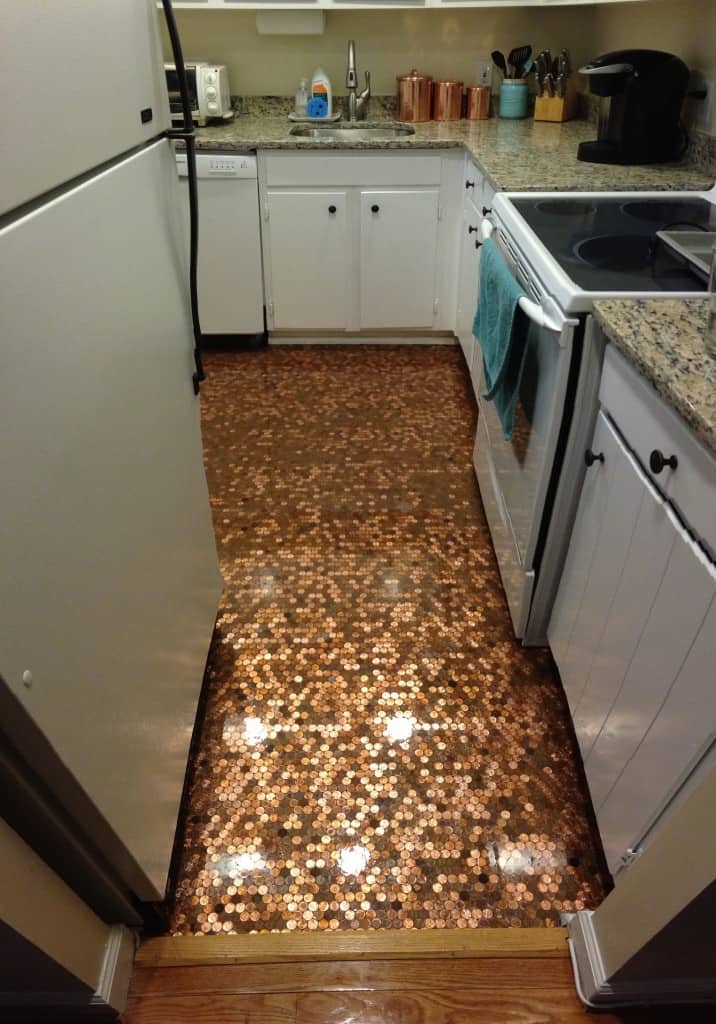
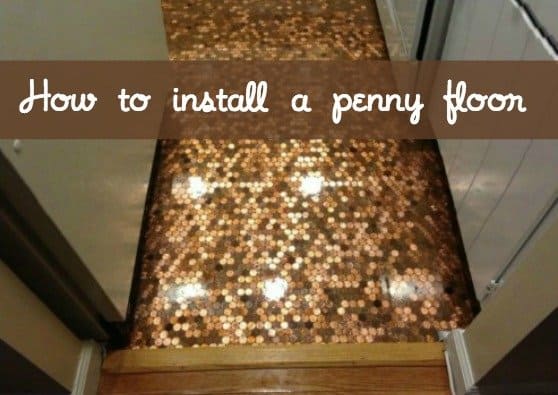
Have you been wondering how to install a penny floor? If you're looking to put money into a room you can literally do so by using pennies and epoxy. I'll tell and show you exactly how I did it, step by step.
I recently bought a home and I have been on a DIY kick. When I was out with my relator and found “the one”, I looked at the kitchen and instantly decided a penny floor would light up the room. I'd seen a penny floor at the restaurant Lincoln in Washington, DC and other penny projects all over Pinterest, but didn't have any idea what I was getting myself into.
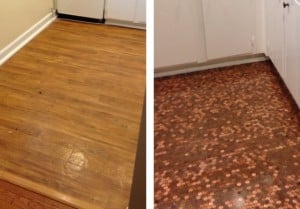
How to Install a Penny Floor
I decided to do my kitchen because the floor is only 38 square feet. Although it seemed like a small space and not too big of a project, by the time we started laying about $2.78 worth of pennies per square foot the space started to feel much bigger!!
I laid the pennies very close and tight together so it ended up being 278 pennies per square foot. Therefore, I needed 10,564 pennies and some change. I started by asking friends to use me as their Coinstar and raided my nephews' piggy banks, but ended up having to visit multiple banks. Banks would offer anywhere from about $10-$40 in pennies depending on what they had available. I decided to not clean the pennies because when you're working with over 10K, as my dad reminded me multiple times, “you'll drive yourself nuts.” Plus it's very hard to get a penny super clean and shiny. I suggest that you pour all of your pennies into one container, especially if you get a lot of coin rolls from banks. The pennies in rolls can sometimes be all of the same color. This will make your floor coloring more diverse. A fun thing to do is leave ‘Easter eggs' in your floor for guests to keep an eye out for. I have two (1) square foot areas that are all heads up, one1943 silver penny that is heads up, and one penny that is VERY yellow that I call my “Steelers” penny.
The floor I decided to refinish had brown linoleum and was very level, so I didn't have to do anything to my floor other than clean it. If your floor isn't level or you don't like the floor color (which will slightly show through the small gaps in the penny lineup) you'll want to change it. Since it was the kitchen, we moved the oven and refrigerator out of the room. We didn't put pennies under the oven space since copper conducts heat, but we wanted to make sure we got it right along the edge. We also temporarily removed the baseboard molding so once completed the edges would look perfect. I even had people ask me if we cut pennies because of how precise it looked once we put the molding back.
Expect the penny gluing to take multiple days! How many would depend on the size of your floor and the number of people doing the gluing. Gluing the pennies is VERY time consuming. You could invite friends over, pop open a bottle of wine, turn up some music and have a gluing party. I recommend using good old fashioned Elmer's Glue (Made in the USA) to glue the pennies. Use the Elmer's Glue and place each penny on the floor. The trick is not to use too much glue. Elmer's claims to dry clear, but it is a bit cloudy still once it dries. You can see EVERYTHING once the epoxy is laid, so don't use too much glue because you'll see the excess.
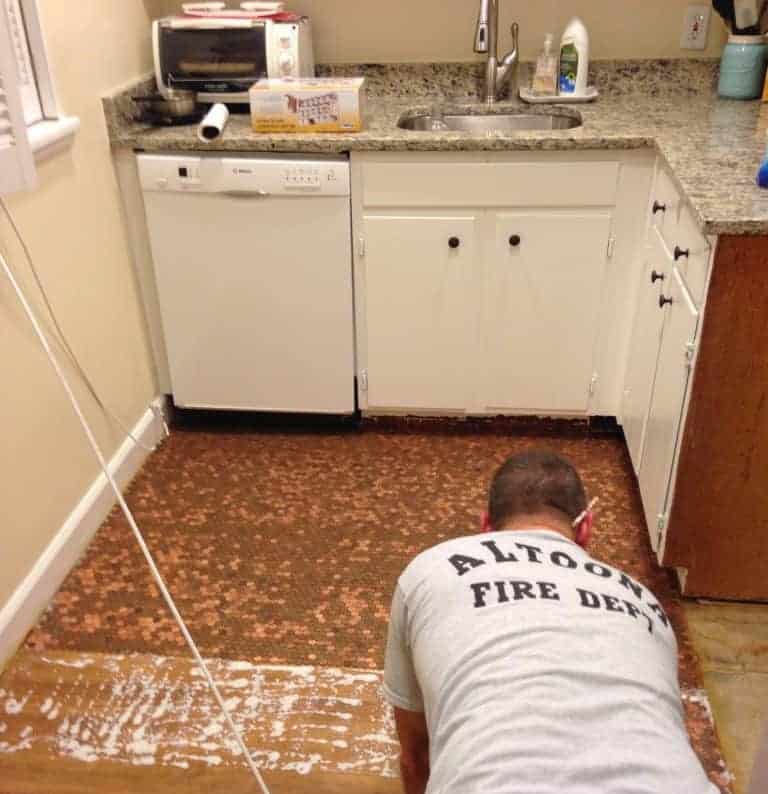
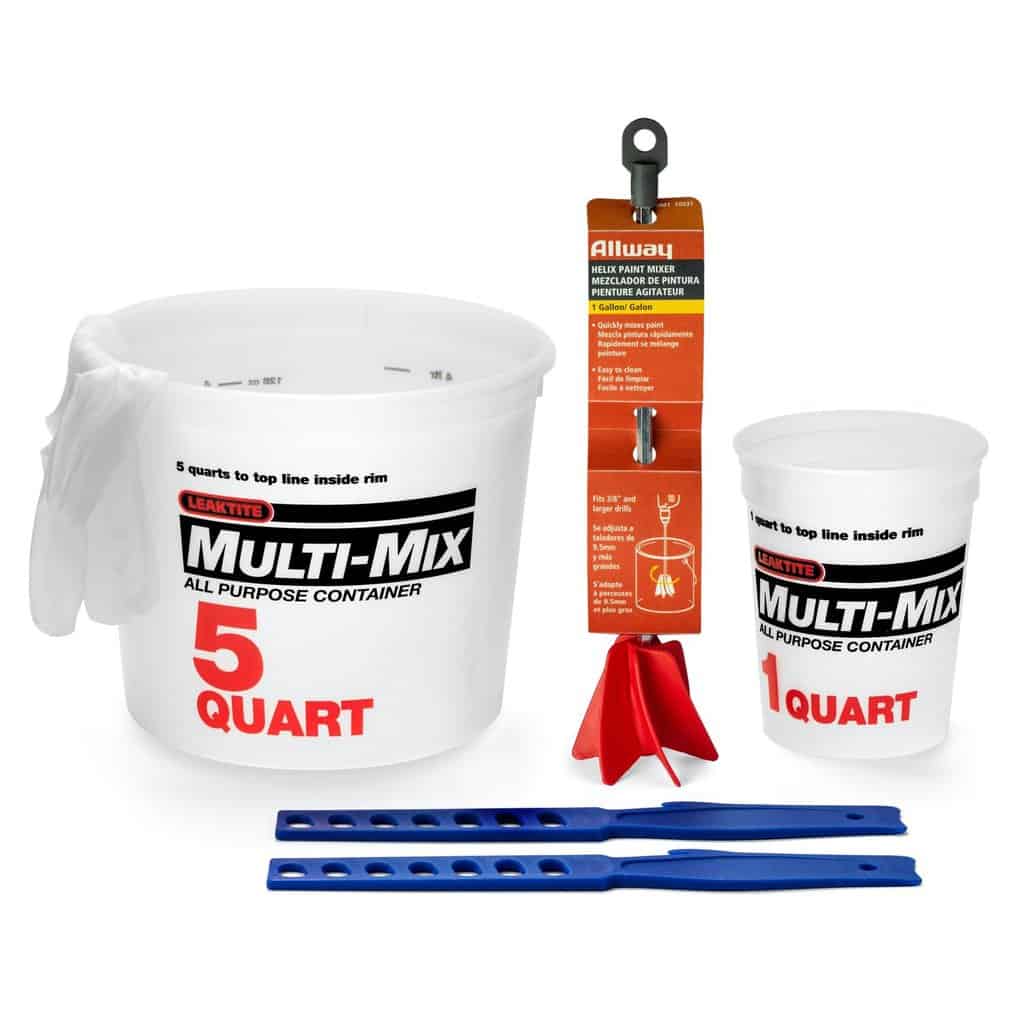
To seal the floor, you use clear epoxy. This step will make or break your project. I did A LOT of research as to which brand to use and I'm very happy I chose commercial-grade Ultra Clear Epoxy from Best Bar Top Epoxy which is Made in the USA. It is UV resistant so it is less likely to yellow over time. It is glossy and self-levels at 1/8″ which is twice as much as your standard epoxy. Go to their website for preparation information and the chart to figure out how much you'll need. I ordered 3 gallons for my 38 square foot floor. I also got the Epoxy Tool Kit which was very helpful. Step by Step instructions come with your order and it is very important to read them a few times over and follow them precisely- especially when it comes to mixing and air bubbles- mix slowly!
Epoxy is very sensitive to temperature. The room must be at 75 degrees or more. My dad is super clever, so we used a space heater and a sheet hung over the doorway to trap in the heat. Otherwise, we would have been sweating and running up the electric bill for 3+ days. We also placed the epoxy in the room with the heater overnight so it was warm when we were ready to start mixing it.
You have up to 20 minutes after you pour to apply heat to remove/pull up the air bubbles. Use a blow torch or very hot blow dryer to remove air bubbles. Keep your eye on the epoxy for the full 20 minutes because bubbles will keep appearing. Mark your space so you know what area to pour each gallon. I had 3 gallons to pour so we marked it in thirds. Use new buckets and stir sticks with each gallon you mix in order to keep the two parts as equal as possible.
Finally, all that is left is to wait for the epoxy to dry and cure. Be patient! This should take at least 72 hours. I decided to do this three days before New Years and I was hosting a NYE party so I only had about 60 hours of drying time before I moved the oven and refrigerator back into the kitchen and it was fine. It survived high heels and about 25 people, but it was a risky move. I'd suggest giving it the proper time to dry and cure.
This article was written by Alexis McDowell.
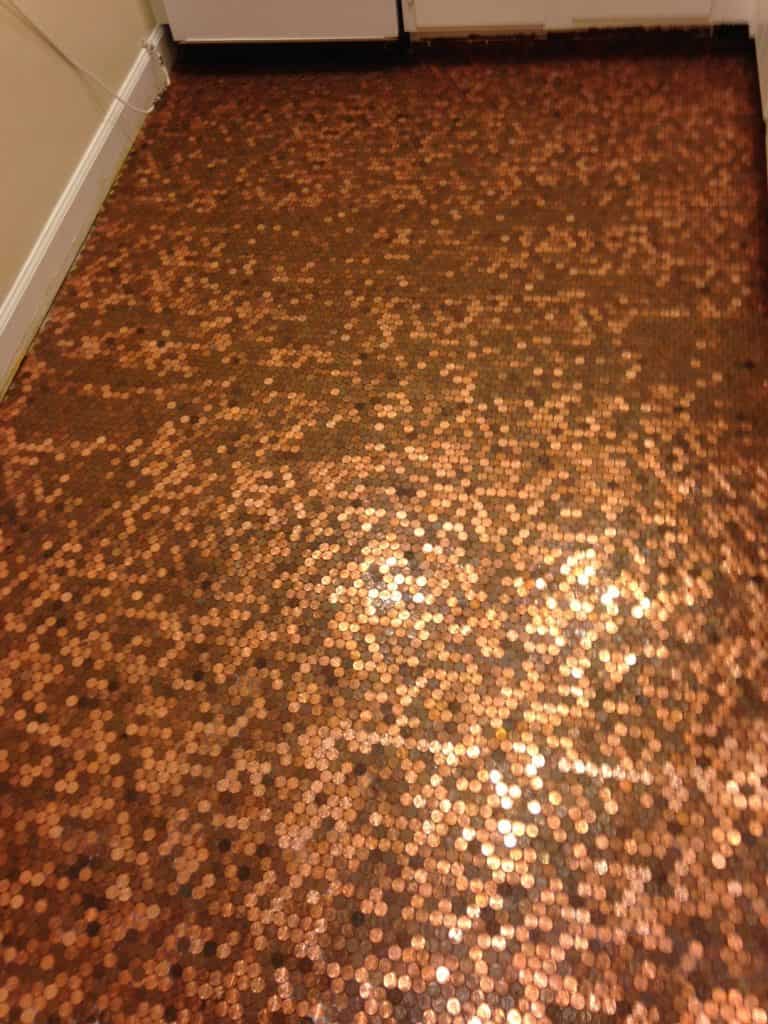
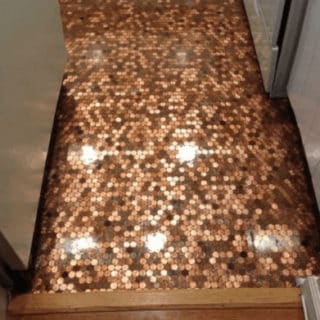
How to Install a Penny Floor
Obviously pennies are Made in USA and all of my supplies were as well, so installing a penny floor is a great Made in USA DIY project. Here's a step by step explanation of the process my dad and I went through to install a penny floor.
Materials
- Pennies (of course!)- Approximately 278 pennies per square foot
- Elmer's Glue
- Epoxy
Tools
- Basic Epoxy Tool Kit: mixing sticks, mixing drill bit, (2) 5-quart graduated containers, (1) 1-quart graduated container
- Additional 5-quart and 1-quart graduated containers as needed, depending on the size of the floor
- Blow torch or hot blow dryer
Instructions
Step 1: Measure The Floor Space
Step 2: Collect Pennies
If you lay the pennies very close and tight together is will be about 278 pennies per square foot. My 38 square foot kitchen took 10, 564 pennies!
Step 3: Prepare the Floor
Make sure the floor is level. If the floor isn't level or you don't like the color underneath it (it will show through the epoxy) you will want to change it. Move everything out of the room- even appliances. Don't put pennies under a stove. Remove baseboard molding so you can get the pennies right to the edge (you will but the molding back on after the project is done). Wash the floor and wait for it to dry.
Step 4: Glue Pennies to the Floor
Gluing the pennies is VERY time consuming. I recommend using good old fashioned Elmer's Glue (Made in the USA) to glue the pennies. Use the Elmer's Glue and place each penny on the floor. The trick is not to use too much glue. Elmer's claims to dry clear, but it is a bit cloudy still once it dries. You can see EVERYTHING once the epoxy is laid, so don't use too much glue because you'll see the excess.
Step 5: Prepping and Pouring the Epoxy
Prepare the epoxy per manufacturers directions.
Epoxy Tip #1: The room should be at least 75 degrees. We used a space heater to keep the room warm and hung a sheet over the door to trap the heat in. We also left the epoxy in the room over night so it was warm when se used it the next day.
Epoxy Tip #2: Follow the epoxy instructions closely to avoid air bubbles as you are stirring and mixing the epoxy.
Mark your space so you know what area to pour each gallon of epoxy. I had 3 gallons to pour, so we marked the floor in thirds. Use new buckets and stir sticks with each gallon you mix. Keep your eye on the epoxy for air bubbles when you pour. Apply heat with the blow torch or blow dryer to remove bubbles. You have up to 20 minutes to remove them and they will keep appearing for the full 20 minutes.
Step 6: Wait While Epoxy Drys and Cures...then ENJOY!
Drying Tip #1: After 72 hours the floor will be 99% cured and ready for you to walk on. I'd avoid putting heavy objects on the floor if you can.
Drying Tip #2: Keep the room at 75 degrees while it is drying.
Notes
Be patient! This project is very time consuming- from gluing each penny to the floor to the time it takes to the epoxy to dry and cure. Wait as long as possible for the epoxy to dry and cure before you walk on it or put heavy objects on it. Trust me, it will be worth the wait!!
Recommended Products
As an Amazon Associate and member of other affiliate programs, USA Love List earns from qualifying purchases.
Disclosure: USA Love List received a discount on the epoxy used in this post. Our opinions are always our own, and we aim to write fair and balanced reviews to promote only the very best of American-made.

Pin this list to save it for later!
Love this list? We know you will love these lists too!














Looks amazing, but cleaning this floor would take ages
How do you think this would work as a backsplash. The colors seem perfect for my countertops.
Is the floor slippery when wet? Beautiful & unique
How slippery would this be as a shower floor? I love the idea!
Thank you so much for this post! I have read it several times, and am finally working on our penny floor project. The glue we chose to use after some testing is “Gorilla Glue Wood Glue” it dries clear and holds them in place quickly, making laying the pennies one at a time very easy. We preferred it to the Elmer’s version we tested which left some spots white if it was put on too thick. Other Gorilla Glue brand products were terrible, but their Wood Glue was perfect for this project.
Hi, I just love the floor. I’m a quilter and have been around all different types of fabric all my life. Here is a thought for anyone who wants to do this. Use Elmmer’s glue and cheesecloth and the 12 X 12 frame. Dip the cheesecloth (you can dye it any color you want) into the Elmmer’s and ring it out, place it on a flat surface and put your frame on top of it. Add your pennies and place them as you like, when they are all in place you can move your frame and make another “tile”. When you have them all ready you can lay them on the floor with the cheesecloth still attached! No messy contact paper to deal with!
I’ve seen pics from some other copper penny floor projects before, & they look so cool! Yours looks wonderful – thanks for all the tips!
We have a penny floor in the family business, Joe’s Pizza & Pasta. We love it! Customers love it!
How do deep clean and maintain epoxy sealer? Noticed some dark spots in places.
Thank you!
Angie
How many pennies does it take to do a 12X12 or square foot?
12×12=144 sq ft. x 278 pennies per sq. foot = 40,032 pennies ($400.32.)
What an innovative use for pennies. Looks like it would last a long time too!
Should this work on ceramic tile.
Why does the room have to be a certain temperature? I’m looking at doing one of these on an outside step but I don’t know how I can get it to that temperature. I can’t see anything on the Epoxy website about having it at a certain temperature. Is that an essential part of the process?
Thanks,
Rosie
Rosie, epoxy outside and in a high-use area is not likely to succeed. UV light yellows the epoxy, which might not be terrible with copper…but scratches seem probable. There are highly scratch resistant top coats (SCC’s Ultimate Top Coat…) but I think you’d most likely regret the whole thing. Inside a house, away from light, they might be an idea for stair risers, though. The temperature and humidity both affect epoxy’s ability to “gel” and to stick. Too cool or any water at all during setup, and it may never properly set up at all. Not to be a downer, but you did ask…
Can I just glue each penny and put down on the floor .. if so what glue would you get
Thanks
Quick question:
If you needed to get under the floor for whatever reason would you have to cut into your floor?
Me and y husband were thinking of doing this in our small bathroom but if something happens and a plumber needed to get under the flooring… you see the problem…
My sister suggested making penny tiles like you did but set them in the Epoxy first (so like normal titles rather than putting epoxy onto the floor….hope that makes sense?…). In your opinion how difficult would that be to do?
SOME OF THE ARTICLES I HAVE SEEN REQUIRE USING GROUT. DID YOU USE GROUT ON YOUR FLOOR. I AM HAVING A HARD TIME WITH IT, I AM HAVING TO DO A LITTLE AT A TIME BECAUSE I HAVE A MEDICALLY FRAGILE CHILD THAT I AM NOT ABLE TO TAKE FROM THE ROOM FOR LONG ENOUGH TO COMPLETE IN JUST A FEW DAYS
I want to thank you for this post I was looking for a way to redo my floors cheaply, beautifully, and a little bit at a time since I am not a typically DIY person. The fact that I can do a square foot a night makes it the perfect project
I would love to do a floor like this. A friend owns a bar and his came like it, it is so cool looking!
Would spray epoxy work on this?
I’m near the stage of sealing with epoxy and saw you used 3 gallons for 38 SF. I have 30 SF. The chart looks like you would need twice that amount to seal your floor. Am I missing something?
what is your subfloor? Can I tile the coins right over laminate flooring?
Hello
Your floor looks completely gorgeous, good work 🙂
I have been laying pennies for a few days now. I decided to lay the pennies with the Queen facing the same way so that the special ones of my loved ones birth years are different, that and my partner thinks I’m crazy hehe. I had to self level the floor as it was uneven but so far so good. I have put down approx £80 worth and it so beautiful, there’s even a one cent coin there 🙂 We are moving onto the epoxy after grouting but I’m struggling to find a cheap one sadly. I found your article for tips on laying it. I would love to know, did you use a barrier at all for each section? I’m nervous as I don’t want to ruin them by getting it wrong.
Thanks for the tips on the bubbles too 🙂
Awesome! We did not use barriers. Each section will go as far as it can and completely self levels. It is cool to see how it will just stop!
Unfortunately this Penny floor will scratch terribly and will not stay in the condition as when it is first done. I’d like to see these floors after a few months of wear.
Hi Rich,
It’s been two years since I did this project and so far it has held up great. No scratches and still just as shiny. I’m sure it probably has a lot to do with the type of epoxy you use.
Alexis
Alexis, how did you or what did you use as a border to keep the epoxy from sealing against the cabinets?
This is the part I’m struggling with 🙁
We took off the baseboard molding and then re-installed it once the floor was done. Where we took out the oven the epoxy really evenly spreads and just stops. You don’t need to have barriers.
I’ve seen this online & it looks so cool! I wondered about the easiest way to do it. I even wondered about first gluing them to a nice floor tile & then putting the tiles down–but what if the pennies didn’t fit just right, lol. Thanks for the tips!
i love the way this looks! every penny has its own look so no 2 floors would look the same. Great idea!
Thinking of all the different elements that can be used instead of pennies. Sea glass would be AWESOME. I will divide up the colors of sea glass and lay them in a mosaic scenery pattern. I had no idea how I could do this before I read your article. And I have another perfect place for a penny floor. The ideas are endless
Sea glass sounds great! Good luck
It’s so bold and shiny I think it would look better as a backsplash .
Hello this was nice!! how is the floor holding up? any yellowing or loose pennies? lol how do you clean the floor?
Wow, this must have taken forever! I love the result, though. Good job!
We’re planning to do a penny floor in our laundry room…how in the world were you able to blowtorch air bubbles?? And by that I mean, how were you able to reach everything without actually being on the floor??
Hi! You have to pour the epoxy in sections. Be sure to work from the back of the room forward. Right after you pour your first section you have 20 minutes to work with until you need to pour the next section so take that 20 mins and use the blow torch to get the air bubbles out. Good luck!!
Re: Pouring the epoxy? Did you put a barrier of any kind between the sections? If not, what kept the first section from moving into the second area? If you *did* use a barrier, what did you use & how did you eliminate the joint line?
ithanx!
We didn’t use any barriers. If you keep the timing correct the epoxy meets the previous section and because it takes a long time to cure, there it blends together with no joint line.
vinegar mixed with lemon juice cleans copper almost instantly would be useful for this project
What an awesome floor. I have a Galley kitchen with tile,would I need to remove the tile first.
Incredibly beautiful. Wonder how much time you would’ve saved having the sheets of pennies already made like these here
http://www.real-penny-tile-projects-made-easy.com/covering-a-floor-with-pennies.html
Anyway great job!
This would make an amazing bar top!
There is a Bar with old coins in the Bartop, in Independence, Oregon. I believe the address is 101 Polk st. I bartended there for about 5 years!
For all hard work you put in, it looks awesome. Bet it looks even better in person, than in photos. What a unique idea…never heard of it before…so cool!
You mentioned about not putting heavy objects on the finished floor. Is that just for the first 72 hours? I want to do my garage and I have a few VERY heavy toolboxes on wheels. I don’t mind waiting a full week to move stuff but, I am hoping that the weight of the toolboxes on the floor will not screw anything up.
I think it is wrong to put our great AMERICAN LEADER ON THE FLOOR….AND ISN’T ILLEGAL TO USE US CURRENCY THIS WAY???
According to the US Mint, if the currency can be is not defaced beyond using, it is legal to lay coins as tile. For example, it would be considered a federal offense if I were to wall paper my room with US dollar bills because there would be very little possibility that the bills could be reused; however, coins could be pulled up from this type of tiling with minimal, if any, damage due to their metallic durability, and therefore can be used again as US currency.
Ahahahaha I was waiting for someone like you to say this. I think its a beautiful way to commemorate a great leader- so much so that Im filling a 90sqf space with Lincoln’s face.
This is one of the coolest floors I have ever seen. Love!
We are currently in the process of preparing to do this floor. And I’m wondering, how (or with what) do you clean the penny floor, now that it is installed? Also, how long has it been since you installed your floor and how it is standing up? Have you experience any yellowing or any other issue – after installation?
Thanks for sharing your process and being a resource to fellow DYI-ers.
Thanks for the detailed instructions, links, and follow up to questions. We are doing our 40 square foot bathroom.
Based on your advice I scrapped the contact paper “tile” idea and will start laying pennies individually.
Since we are in Seattle we are going to also include a an old Seattle world’s fair dollar coin in the floor, an old NYC public restroom token, and some Chinese and Kenyan coins from our travels.
We thought about a border using the 50 state commemorative quarters but the size of the quarter leaves a big gap when mixed in with the pennies.
BTW- Metal shears work great for cutting pennies in half!
Thanks again.
Cutting them would be a Federal Offense
Very cute! You’re brave for tackling such a project. Thanks for sharing your tips!
As soon as I saw this, I started noticing tons of other copper penny ideas on Pinterest. SO cute!
My first thought was, “That would take forever!!!” But, you know, I do love the finished look! Beautiful.
OMG what a cute idea!
I don’t see the directions for doing this on/as a backsplash? Help please on DIY directions.
Hi Sharon- I’m not an expert and have only tackled this floor project. I can’t advise with the backsplash. I’m sorry and good luck if you end up doing one. I think a penny backsplash would be great! Alexis
Applying this technique to the “toe kick” should be possible. But I see problems with the corners without cutting some penny’s to cover the kick.
I have directions for backsplash, just have to pull out my to do book. Will try and find it and post it today.
I’m gonna guess one would use a paint brush …..
Looks good.
so did you pour one gallon, torch out the bubbles for 20 minutes and then pour the next? essentially doing the floor in sections instead of at one time?
can you see the joins from the different pours?
Yes, exactly! We did this in 3 different sections because we had 3 gallons. And be sure to use that 20 minutes to get the bubbles out because there is no turning back. Alexis
DIY Chad
Did you end up seeing the individual 1gal pour sections?
Very curious.
Does the floor scratch easy?
Thinking of doing our “music” room with a treble clef or music notes with bright pennies and dark pennies over reminder.
Thanks for your help
DIY Chad
Did you end up seeing the individual 1gal pour sections?
Very curious.
Does the floor scratch easy?
Thinking of doing our “music” room with a treble clef or music notes with bright pennies and dark pennies over reminder.
Thanks for your help
Hi Marcia- I’m sure you’re done with your project. I didn’t do a seal coat. I hope your project turned out well!!! Alexis
Looks great! I want to try it.
Is it slippery? It looks shiny and slippery which could be a problem with water.
Loved hearing what you would do differently next time! That makes it so much easier for anyone else trying it.
Hi GiGi- Sorry for the late reply. It isn’t slippery and when it’s wet it’s like any other hard surface floor. Good luck if you decide to install one! Alexis
How do u apply epoxy in sections?
Thanks, Rosie! If you ever tackle a project like this be sure to share it with us!
Im doing a penny floor and was wondering if i could build it right on my sub floor (plywood)
Im doing a penny floor and was wondering if i could build it right on my sub floor (plywood)
See the Stone Coat Countertops (.com) training videos for using epoxy. Cannot use directly over plywood. Cumbersome prep process involving metal lath etc. but if you’re determined, where there’s a will, there’s a way.
You should have used Canadian (or Zimbabwe) pennies… Cheaper but same effect. Being from the burgh, I live the Steeler one. Wonder if you could have dipped each in a copper solvent or cleaner like tarnex etc to get a uniform color if desired? Thinking about doing my bathroom counter in Bahamian coin I’ve collected.
that is a cute idea, I could see it esp for a rec room, or home office. I like the wood floor from the before, too!